As you proceed onward in Act 3 of Pathfinder: Wrath of the Righteous, you’ll encounter extra mind teasers. One among these entails a dozen plates, with a number of bridges that may make sections inaccessible. Right here’s our Pathfinder: Wrath of the Righteous Sacred Lands puzzle information that can assist you full the Weary Guardian quest.
Word: For extra info, try our Pathfinder: Wrath of the Righteous guides and options hub.
Pathfinder: Wrath of the Righteous – resolve the Sacred Lands puzzle
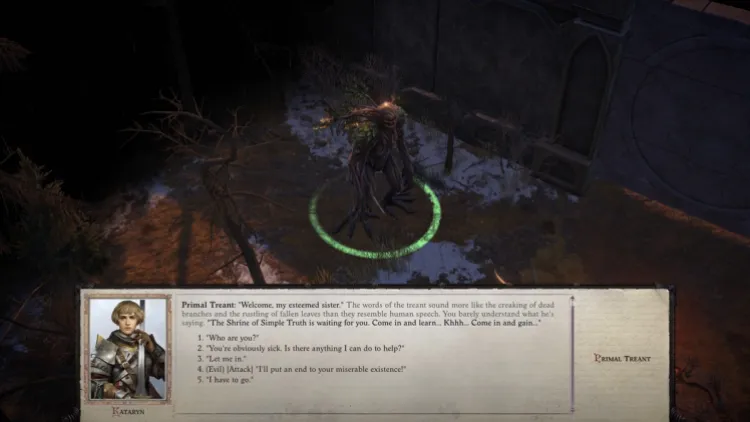
The Sacred Lands puzzle in Pathfinder: Wrath of the Righteous is a part of the Weary Guardian quest. Upon arriving within the location, a Primal Treant will welcome you. You may have the choice to assault it, however I don’t counsel that in any respect. As a substitute, proceed contained in the ruins, whereupon the remainder of your get together will likely be left behind. That’s proper, solely your primary character will enterprise forth.
Word: I counsel saving your recreation exterior the ruins. You may reload this save in case you mess up.
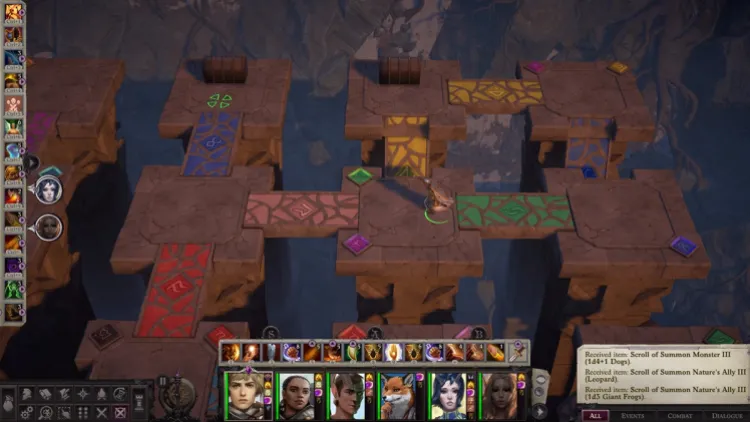
Sacred Lands puzzle answer and space map
This space has a number of platforms linked by bridges, and also you’ll additionally discover a number of coloured plates on the ground. Everytime you press one, it’ll collapse or increase a corresponding bridge. Since your purpose is to achieve the other aspect of the ruins, you’ll have to be conscious of what you’ll work together with. It may be pretty simple to get well (i.e., press the identical swap once more). Nonetheless, if you happen to mess up and run round an excessive amount of, you may discover all of it a bit complicated. Load the aforementioned reserve it that occurs so you can begin from the start.
In any case, you possibly can check with the map beneath. We’ve numbered every spot that that you must go to and any associated actions. Be aware of the sequential order as properly.

The total sequence
- #1 – Run all the way in which to the chest on the upper-left part with out touching something for now. Decide up the Elven Notes.
- #2 – Darkish blue plate (lower-left).
- #3 – Black plate (center/lower-left).
- #4 – Pink plate (center).
- #5 – Mild blue plate (upper-left).
- #6 – Pink plate (proper).
- #7 – Pink plate (proper).
- #8 – Open the upper-right chest to acquire a couple of magic scrolls.
- #9 – Yellow plate (upper-right).
- #10 – Purple plate (proper).
- #11 – Pink plate (identical as #4).
- #12 – Yellow plate (upper-left).
- #13 – Pink plate (identical as #7).
- #14 – Purple plate (upper-right).
- #15 – Black plate (center/upper-left).
- #16 – Pink plate (lower-right).
- #17 – Inexperienced plate (proper).
- #18 – Mild blue plate (center; identical platform the place #3, #4/11, and #15 are).
- #19 – You’ve lastly made it to the opposite aspect of this space.
When you’ve reached the opposite a part of the ruins, a demoness named Lilitu will seem. You may reply to her primarily based on the Mythic Path that you just’ve chosen. As an illustration, the Angel Mythic Path has your character telling her to begone just like the foul hellspawn that she is. The Azata Mythic Path, in the meantime, enables you to name on an Historical Treant Guardian that can assist you in the course of the battle.
After defeating Lilitu, you possibly can open the chest to amass extra scrolls. Then, exit the temple and discuss to the Primal Treant. That’s it, you’ve solved the Sacred Lands puzzle in Pathfinder: Wrath of the Righteous, and also you’ve additionally accomplished the Weary Guardian quest.

Pathfinder: Wrath of the Righteous is accessible by way of Steam.


