While you’re on a mission to convey order to chaos, you want the proper gear to do the job. Typically this implies going loud, weapons-free, however usually it requires finesse, and tools tailor-made to the mission. Listed here are one of the best loadouts for Prepared or Not, versatile for any event!
Greatest Loadouts, munitions, and tools in Prepared or Not
The most effective loadouts in Prepared or Not won’t be universally usable between missions, however many work as multipurpose builds with solely minor tweaks wanted. Some variations are refined, like armor plate varieties, whereas others just like the Lockpick Gun have hyper-specific situations the place they’re very important.
Associated: Methods to get S rank in Prepared or Not
I’ll preserve that no matter loadout you select, your main weapon ought to ideally be the VKS assault rifle or the Beanbag shotgun if you need one of the best scores. Going non-lethal makes the distinction when acing a mission and even in some ways merely succeeding.
Blitz Breach
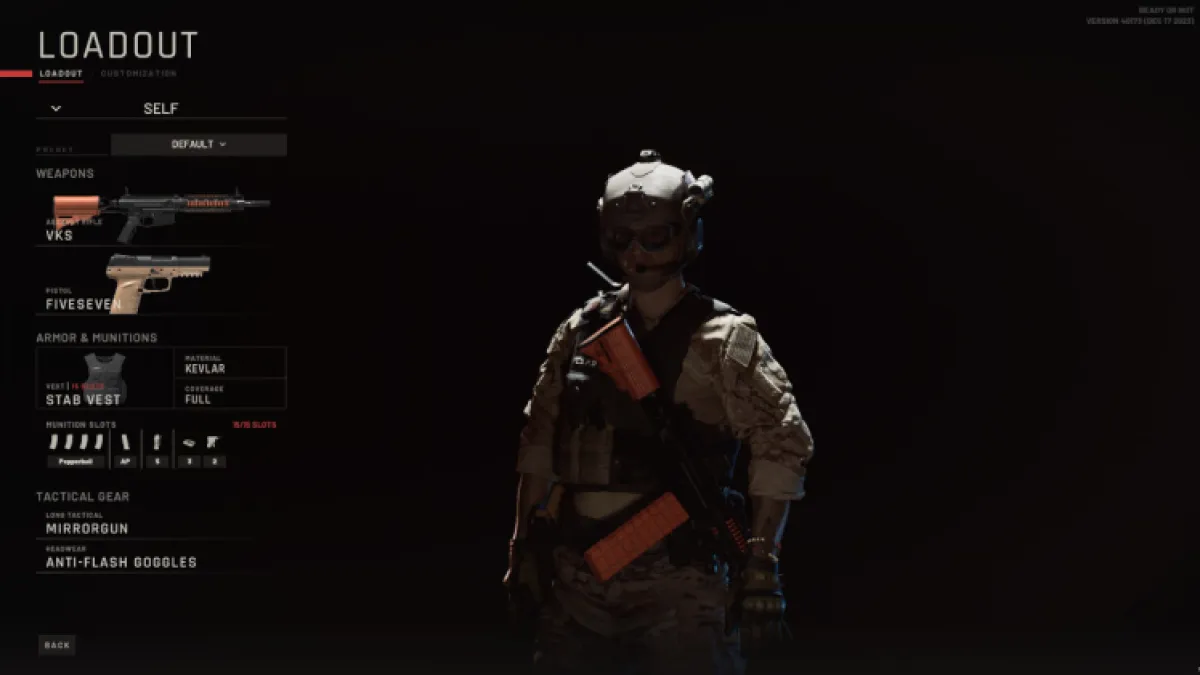
This construct is the quickest of the loadouts I’ll function for Prepared or Not. That is ultimate for missions early on like Twisted Nerve the place you must shortly clear rooms, toss down flash grenades, and continuously keep in your toes in opposition to hostiles actively trying to find you.
- Armor: Stab Vest
- Materials: Kevlar
- Protection: Full
- Munitions: 1x AP Pistol Magazine
- Tools: 5x Flashbang, 3x Wedge, 2x Lockpick Gun
- Lengthy Tactical: Mirrorgun
- Headwear: Anti-Flash Goggles
The Stab Vest with Kevlar lets you transfer shortly in any situation, with no false begins. That is nice for if you find yourself making an attempt to pacify or intimidate your opponents however aren’t kitted out for a gunfight.
The pistol ammo is for emergencies solely, as I advocate going non-lethal as a lot as attainable except you’re afraid for a hostage’s life. Together with your Anti-Flash Goggles, a ton of Flashbang grenades are an awesome pure alternative and so they work on quite a lot of indoor-focused maps like 23 Megabytes a Second, Twisted Nerve, Rust Belt, and extra.
Different assurances just like the Mirrorgun and the Lockpick Gun make it easier to scope out and shortly storm a room with out alerting hostiles. Lastly, the Wedges are very important if you’re stacking your staff up on a key spot, and are involved about getting a shock assault behind one other door within the room.
Going Loud

I couldn’t consider a flashier identify for this one, however this loadout prioritizes safety with out sacrificing velocity.
- Armor: Mild Armor
- Materials: Ceramic
- Protection: Full
- Munitions: 1x AP Pistol Magazine
- Tools: 3x Flashbang, 2x Stinger, 3x C2
- Lengthy Tactical: Breach Shotgun
- Headwear: Ballistic Masks
This one strikes barely slower, however with Ceramic plates, you’ll be able to shrug off extra oncoming fireplace in short engagements. You possibly can shift round your ammo relying on whether or not you need a deadly variant on this construct, however 1 AP Pistol Magazine is my default, HP rounds are sometimes simply too damaging to a very good run.
Flashbangs function right here closely as nicely, though you’ll be able to swap out some for Stingers if you want. Nevertheless, C2 is an wonderful software for enemies hugging doorways should you can hear them respiratory on the threshold, permitting you to stun them and even get an achievement if caught on this blast!
The Breach Shotgun is useful for breaking down any door, however ensure you’re ordering your staff to clear the room with you when you’ve damaged the door. Lastly, the Ballistic Masks protects in opposition to some small arms fireplace in a pinch.
Going Darkish

The same construct begets an analogous identify on this barely tweaked model of the earlier construct. It trades safety for visibility, and can show its worth for exploring dimly lit rooms, tunnels, and nighttime maps extra simply.
- Armor: Mild Armor
- Materials: Ceramic
- Protection: Full
- Munitions: 1x AP Pistol Magazine
- Tools: 5x Flashbang, 3x C2
- Lengthy Tactical: Battering Ram
- Headwear: NVGs
I’ve been capable of make fairly robust pushes in missions with this and both the Beanbag Shotgun, the VKS, or the MCX if going deadly. The NVGs make the distinction in high-intensity missions at the same time as early as Twisted Nerve the place you begin to see tunnels think about, and even simply outside parts at nighttime.
The Battering Ram, should you can coordinate your staff, permits for an on the spot dynamic entry, bashing and opening virtually any door you encounter. With the ability to see these threats and catch them unaware at nighttime, and stun them into submission, is a good asset to have.
Crowd Management

This is likely one of the greatest Prepared or Not loadouts, the closest to an equalizer as you may get for very disturbing maps like Greased Palms. It lets you shrug off oncoming fireplace whereas taking milder spall injury on lined areas of your physique. It’s, nevertheless, gradual, so preserve that in thoughts with the next particulars:
- Armor: Heavy Armor
- Materials: Metal
- Protection: Full
- Munitions: 1x AP Pistol Magazine
- Tools: 2x Flashbang, 2x CS Gasoline
- Lengthy Tactical: Tactical Defend
- Headwear: Gasoline Masks
Heavy Armor is greatest if you double down on it, so Metal is the best way to go so long as you don’t invite an excessive amount of fireplace. That is the place the Tactical Defend elements in, providing safety if you’re in an lively shooter situation.
Very like with all the opposite builds, the 1 AP Pistol Magazine is for the worst case situation when your main weapon is simply too gradual to reload. Flashbangs and CS Gasoline are key right here in containing conditions, with Flashbangs being ultimate for smaller rooms and hallways, and CS Gasoline being greatest for dispersing crowded hostiles.
Lastly, the Gasoline Masks lets you move by means of the cloud of smoke you create with the gasoline grenades, sending enemies to the partitions and behind cowl so that you can arrest them individually.
Shut Quarters Containment

This closing construct is one other tweak on the Mild Armor builds, with larger give attention to shortly assessing and storming rooms along with your staff. I like to make use of this construct with the Beanbag Shotgun because it will get faster non-lethal potential than the Pepperball weapons, however with the draw back of probably being deadly should you overdo it.
- Armor: Mild Armor
- Materials: Kevlar
- Protection: Full
- Munitions: 1x AP Pistol Magazine
- Tools: 2x Flashbang, 2x Stinger, 1x Wedge, 2x Taser
- Lengthy Tactical: Mirrorgun
- Headwear: Ballistic Masks
This construct is versatile however is about containing threats, blinding set off glad hostiles with civilians close by, and subduing targets when no innocents are close to. It’s nice, however you’ll need the small velocity increase of Kevlar on this case. Pack loads of main ammo, and think about swapping in for one more Flashbang should you want it!
My favourite weapons in Prepared or Not
You’ll have observed I didn’t go over the weapons particularly usually. That’s partially as a result of you’ll be able to tailor that half to how every weapon handles for you, however I’ll give a rundown of one of the best weapons I’ve come throughout within the recreation:
- Non-Deadly: VKS
- Assault Rifle: G36C
- Submachine Gun: P90
- Shotgun: Supernova
I might counsel the Beanbag shotgun as an honorable point out, however so far as non-lethal choices go, the VKS is excellent. Pepperballs enable one thing just like a ricochet impact to bullets, the place you’ll be able to fireplace on the partitions and flooring close by enemies and stun them. This has been a lifesaver, and you may peek into doorways to take pictures like this after recognizing them with a Mirrorgun.
The G36C in all fairness nice with robust accuracy in close-to-long vary, room for attachments, and powerful maneuverability. In the meantime, the P90’s been a mainstay in real-world counterterrorism and police loadouts, with unbelievable ammo capability and dealing with, albeit an unconventional magazine cartridge. Lastly, should you’re going loud, the Supernova might be fired with none finesse and can kill any menace useless from surprisingly distant, it’s fairly damaged for lethal-focused gamers.
Usually, one of the best loadouts you’ll be able to select in Prepared or Not provide refined variations, however with the proper instruments for the job, you’ll survive extra usually along with your staff. As a substitute of a one-size-fits-all construct, you must have just a few concepts like this on standby for if you get caught within the recreation!


